Building Oars Cheaply (and Fast)


|
The average rowboat will need a pair of 6'6” or 7'0” oars. On sale (and with free shipping), a pair of Caviness will cost $50, which will be $50 wasted if you want oars that are pleasant to use. $10 and two hours will build you a better pair. Here's how.
Traditionally, oars are created from one piece of stock, most of which is then whittled away just as a statue might be created from a block of marble. The method can produce truly beautiful oars (but not quickly, unless you have access to a CNC machine). Instead, if the oars are assembled from parts, nearly all which (except for the grips) can be cut on a table saw and then glued and screwed together as a unit, speed can be gained with no loss of functionality, which is what should matter to you, not how the oar looks. So you've gotta decide from the getgo that you want oars that work good, not oars that look good. That means foregoing the curves and delicacy that can be achieved with handwork and, instead, emphasizing making straight-line cuts in dimensional lumber. First, let's build the blade and lower loom, which is a three-layer sandwich that later will be joined by a scarf joint and cheek plates to the also three-layer sandwich that is the upper loom & grip. (1) Decide your oar length. Decide your blade pattern. (Blade patterns will be discussed separately.) (2) From your stock of air-dried, 6', cedar, fence boards, select three whose density seems to be the same, whose figure and color are compatible, and whose knots you could tolerate. (Else, choose any wood you want.) Run the three through a planer, taking off the minimum needed to make three be of uniform thickness. Select the two that match closest in weight or that look the best. Joint one edge on each. Joint the other edge by triming it on a table saw. Measure the width of the narrower board, subtract two saw kerfs and divide that number in thirds. That becomes the width of your loom and its splines. Note: you do not need a joiner to do the jointing. A hand plane and straight-edge is plenty fast and a good skill to learn. (3) Lay out your blade and lower-loom pattern on the boards. Cut each blade & loom blank as one piece. (If you lack access to a table saw, use a jig saw or a band saw. If you don't have either, use a handsaw meant for ripping.) Save the waste, which will be needed to create splines. (4) Run the blade & loom blank through a planer, taking it down to its final thickness. (1/2” for oars that will be abused. 3/8” for oars that will see average use. 1/4” for delicate blades (in which case, you ought to be laminating your blades and building them as curves). If you're sure of your spline thickness, also run them through the planer. Else, build the oar and adjust the shape/dimensions of the lower loom later, with a power plane, draw knife, spoke shave, belt sander, etc. If you screw up any of the previous steps, you've got one back-up blank. If you don't screw up, use the back-up board to make a bird house with your grandkids as a Saturday project. Now, let build the grip and inbd loom. (1) Decide whether you want to balance your oars by adding lead, or by making the inbd loom fat and heavy. Builder's choice, though the lead choice will permit a wider variety of woods. Let's assume the lead-free route for being the more 'traditional' and 'wood-workerly'. (2) Select a heavy wood you'd like to use for the grip and inbd portion of the loom. (Red oak is cheap. Walnut is elegant. Purple Heart is exotic. Old-growth Doug Fir is also a possibility, as are beech, maple, cherry, hickory, etc.) What does matter –-if ease and speed are desired-- is selecting stock that will require no planing, and here's where things get tricky. A properly-balanced oar is a tetter-totter whose outbd portion is almost offset by the inbd portion. Long-time oar makers, Shaw & Tenney, recommend putting 18/25ths of the oar outbd, and 7/25ths inbd, or a leverage ratio of 28%. I prefer 30%. Beginning rowers might want as much as 32%. At this point, the exact leverage ratio doesn't matter. What does matter is that you will be putting roughly two-thirds of the oar outbd and one-third inbd, each of which will have a different shape that complicates estimating how much each portion will weigh. But if your blade-end is light and your grip-end is heavy, things ought to work out OK due to the differing lengths of each part. If not, correct the in-balance by adding lead or by taking wood off somewhere. What you want to build is a oar that requires 8 to 10 ounces of 'hand weight', not the ridiculous 1-3/4 pounds settled for by supposedly professional oar-makers, and certainly not the 2 plus pounds required to use a pair of Caviness oars. You want just enough 'negative balance' to give you tactical feedback and an easy bite on the catch. Any more, and the oar is working you, not the other way around. As a rough guess, if the inbd loom is 2” square and a dense hardwood, and the outbd loom is 1-1/2” square and cedar, you'll be fine. Obviously, the heavier the wood selected, the smaller in section the inbd loom can be. But figure on 1-3/4” to 2” square (compared to the 1-3/8” to 1-1/2” for the lower loom that also might also slightly rounded and/or tapered). (3) You're going to be joining the lower loom to the upper loom with a scarf joint, whose ratio is your choice, but whose thickness will be determined by your blade thickness. 1/2” hardwood stock is common. 3/8” and 1/4” aren't. So some more planing might be required to produce the middle layer of your upper loom & grip sandwich. The two outer layers can be any thickness you want. But using common sizes saves work. (4) Now comes more decisions: grip-shape and grip-length. For shape, select a traditional style or design your own. (Grip-shape will be a separate discussion). Grips are typically 5” wide. But fit the grip to your hands, not the other way around. To that dimension, for turning and machining purposes, add at least an inch that will get cut off later. (5) To decide the length of the middle layer of your upper loom & grip sandwich, you need to do some math. Multiple your oar length by your leverage ratio. To that number, add the length of your scarf, plus the number of inches outbd of the pivot point of oar that makes structural sense to you for the scarf to be placed, plus the one inch (or so) needed as assistance in turning the grip. Cut two pieces to width and length. (6) The length of the two outer pieces of the upper loom & grip blank is the same number as before, minus the scarf. (Or, it is 'oar-length' times 'leverage ratio', plus 'pre-turned grip length'. Same-same.) Cut four pieces to width and length. (7) Glue and screw those units together. Chuck them into a lathe and turn the grips. Pull them out of the lathe, cut the scarfs, and cut off the grip waste. (Depending on your lathe bed, you could turn both as one unit to be later separated, or you might have to use a second scarf to fabricate the loom-grip assembly.) (8) Dry-assemble the lower loom with clamps. Check for the springiness you want (which spline width, thickness, and length will determine.) Adjust as needed. Dissasemble and cut a scarf on the blade blank, Reassemble and dry-fit the lower loom to the upper loom. If all looks good, glue and screw the lower sandwich together and to the upper sandwich at the same time. (9) Congrats. You've now got a functional oar that would benefit from some clean up work, such as giving a better shape to the oar's pivot point and easing all sharp edges everywhere. Leather the oar (with leather or cord). Maybe, spline the blade tip or wrap it in fiberglass (especially if 1/4” blades were built). Oil the grip and the varnish the rest of the oar. You're done. You won't be able to build your first pair in two hours. But the second pair might go that fast if you're making all your parts from patterns, you're proficient on a lathe and table saw, and you aren't obsessing about your finish work. Build the first pair as fast as you can and get the oars in the water. If you like 'em, then build the next pair more carefully and more quickly. It's late. I'll add photos to this tomorrow. Follow-up comments: Depending on the woods selected, use of a planer wouldn't be needed, as wouldn't use of a lathe. What a planer facilitates is using cheap lumber, like rough-cut cedar, and what a lathe facilitates is producing grips from hardwoods quickly. (I've shaped grips from oak by hand and swore I'd never do it again.) I haven't experimented building oars with Titebond III. But I'd be disinclined to do so. As for PL Prem, it has no place in proper boat-building. It's a construction glue meant for static loading in non-marine environments. Use epoxy as your glue, and back up all joints with screws. (Some hardwoods don't take epoxy well, and joints can fail. Resocinol might be a solution, especially if you know your joints and scarf-fits are tight and have high temps and clamping pressures.) Charlie |
|
|
This post was updated on .
I'm going to pick up this thread up again, because I'm building oars again.
Pro builders target a hand-weight at the grip of 1-3/4 pounds, if they even worry about 'oar balance' at all. I prefer a half-pound of hand-weight, which is enough of a negative balance to enable the catch, but feels feather-light on the recovery. Shaw & Tenny put 28% of the oar inbd and assume a 2" overlap. I prefer 30% inbd and accept whatever overlap happens. To balance oars cut from the same wood species typically requires over-sizing the inbd loom or else adding weight, which is often done by boring the grip and pouring lead. I've ruined a couple pairs of oars trying to bore grips, and I hate the look (and expense) of adding weighted sleeves (as the drift boat guys often do). My solution has been to make the outbd portion of the oar from a species with a low specific-gravity, such as cedar, and to make the inbd potion from a dense species, such as oak or purple heart, and to square it. Even then, if the inbd loom isn't to be egregiously over-sized, a bit of weight might still need to be added. With a pair I'm finishing up, adding 4 oz lowered the tip-weight to 3.7 oz, which meant hand-weight became 8.4 oz, or close enough for the girls I go dancing with. Aside: In use, oars are a second-class lever. But when calculating 'leverage ratios' and adjusting for 'balance', it's easier to treat them as a first-class lever, aka, a tee-totter. Thus, if tip-weight on a scale is 4.9 oz and the outbd oar portion is 53.25, those numbers are multiplied and then divided by the inbd length (in this case, 23.5) to give a hand-weight of 11.1 oz, which most people would find very acceptable. But the slight tweak of adding 4 oz dropped the tip-weight to 3.7 oz, hence, a hand-weight closer to my target of 8.0 oz. 'Sand Dollar' weights come in one-ounces increments and are available at sporting goods stores such as Fishermens Marine. A hole is bored in the underside face of the loom with a Forstner bit, and the weight is held in place with a screw. Them fussy about appearance could bore deeper and bung the hole. But I prefer having the weight exposed and accessible in case I want to change it out later. 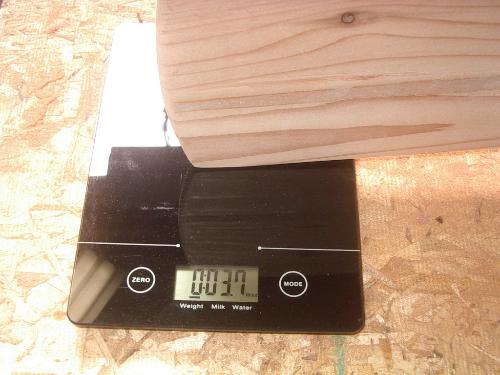
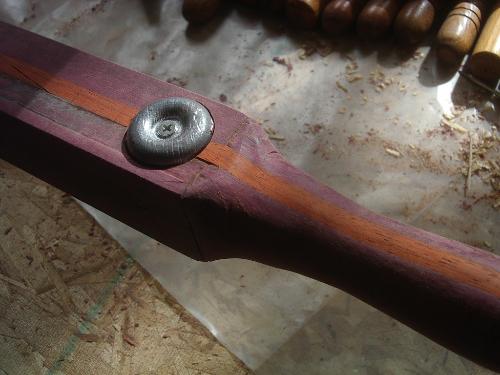 The "leathering" is mason's twine. Varnished and hung to dry. 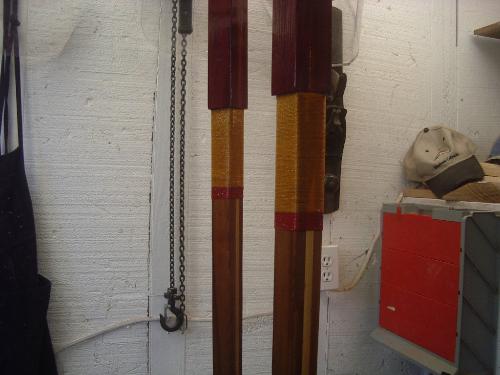 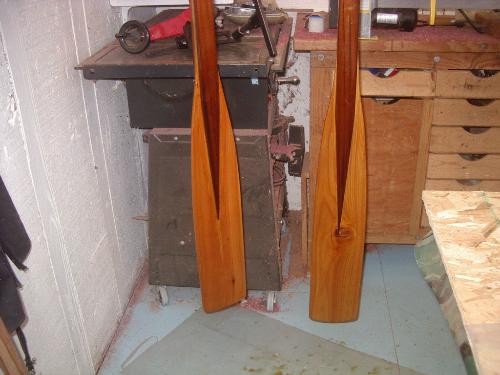 |
|
|
In reply to this post by Charlie43
I'm going to pick up this thread again, because I'm building oars again. This time, a set of 7.5' footers that would be an appropriate size for the Salt Bay Skiff when rowed from the mid-thwart.
My initial thought was to use 3/8" ply for the blade blank, and I had some Occume on hand. But --gees-- that stuff is bland and boring, and the cedar I had on hand for the splines had already been milled to half inch. If used together, the shaft would be only 1-3/8" thick and a bit delicate. My initial thought, also, was to use DeLapp's pattern for the blades (6-1/4" x 21" vs a more customary 5-1/8" x 24"-28"). But I backed away from doing either and dug through my stock of cedar to find a pair of boards that matched closely enough in weight, stiffness, color, and figure and then copied FeatherCraft's blade pattern from a pair of hand-me-downs I recently refurbished. Aside: So much for theory, right? and the back and forth discussion I'm having with John Ost on 'blade shape and oar efficiency'. When push came to shove, I opted for a shape that appealed to my eye, not what could be argued for through actual testing. I've used Culler's (and CLC's) narrow blades on oars, and they work as well (or better) than conventional shapes. But they just don't look right. So much so, I'd prefer to suffer a bit of inefficiency to have oars that look like oars should look like.  With this pair, I'm going to make a couple more changes to my manufacturing process as well. I like the precision in shape that can be obtained when the grip is turned on a lathe. But I dislike the scarfs that have to be cut to integrate the grip to the upper loom and the upper loom to the lower. (I built a oar lathe with an 7' bed. But the vibration of the stock when making the initial roughing cuts scared me away from continuing the experiment. When turning shorter stock, the vibration problems go away. But the grip has to be integrated to the loom somehow, which becomes a jointing problem.) So I'll be shaping the grip with hand tools, though that is tough to do when dealing with hardwoods. Also, I'm going to use Sapele for the upper loom and grip, because it's a bit heavier than Purple Heart and what I have on hand. |
|
|
This post was updated on .
The blade blanks are now glued (using TiteBond III, despite my earlier reluctance). The scarfs --for the clothes pin joint that will join the upper (and heavier) upper loom assembly to the lower (and lighter) lower loom and blade assembly-- -- are now cut.
 . .
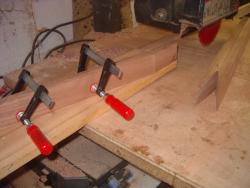 Random comments: Every wood has its own smell and taste when freshly cut. My favorite is pitchy pine. My least favorite is probably Walnut, though Purple Heart and Sapele rank closely with it, as does Khaya. All of them create a dust in the air that leaves an acrid taste in the mouth. Reportedly, White Oak, Purple Heart, and even Cedar can be difficult to glue due to their oils. But I haven't (yet) encountered problems. Costs: Each oar requires one, 6' cedar fence board that I remember paying $2.40 for at Lowes. Together, the upper loom/grip assemblies were gotten out of half of 3.5 bdft of 4/4 Sapele, whose price I'm guessing was around $9/bdft. But since red oak could have been used to equal effect, and that's probably around $3.5/bdft, the wood for an upper loom could come in around $3 each. Add a buck per oar for glue, varnish, and mason's twine, a buck for shop incidentals like sandpaper, jig materials, and prorated tool wear/ replacement, and costs per oar still comes in two dollars under my $10 target. Cheap! Cheap! |
|
|
In reply to this post by Charlie43
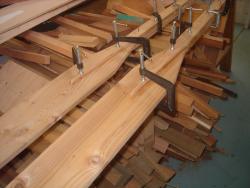
Today, I glued the joints on the 7's (in the background) and roughed out a pair of 6's (in the foreground) --which will bring the count for my home-built pairs to seven.
I should have started building oars long ago. Way easier than boats. Of the first five pairs, I've had two joint failures (to date). One was an easy fix, and that oar is back in service. The other break was going to be more grief than I wanted to deal with. So I salvaged the blades and looms. Yet to be dealt with is four pairs of Caviness that came my way through purchases or hand-me-downs. The best fix for them --which is severe hand-weight problems-- will be to chop off the upper portion of the oar and scarf in a new loom and grip. 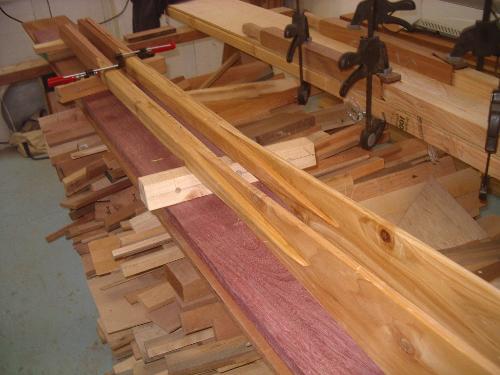
|
«
Return to General discussion
|
1 view|%1 views
| Free forum by Nabble | Edit this page |