Fisherman's Oars, a Documented Build


|
This post was updated on .
In a separate thread, I covered a tiny bit of oar theory as applied to propelling a small, single-user rowboat meant to be a fly-casting platform. The key points were these:
(1) Flat blades are preferred, because much of the rowing will be done by moving backwards (aka, using 'push rowing') to set up for the next cast. (2) Shorter oars are preferred, for being easier to get out of the way when casting or when netting a fish. (3) The oars need to be pinned or indexed to the oarlock, so they don't float away when casting and don't need to be re-oriented when rowing is resumed. (4) The oars have to be balanced so the tip self-immerses to a proper working depth. (5) Additionally, the grip has to be comfortable, and the gearing ratio has to be appropriate to one's strength and conditioning. What I'm going to build is a pair of 6.5's using a pair of 8' foot cedar fence boards. First Question: Where to buy the fence boards? I've had good luck at "big box stores" like Lowes and Hone Depot. Next question: When to buy 'em? Winter time, when stocks are plentiful and there is plenty to choose from. Next problem: The boards are going to be green. That means a couple months of air-drying. Also, expect some splitting and cracking. So buy twice what you need and use the discards for other projects, like framing a pram. Economics: A single Caviness oar costs around $40, and it will need to be reworked to be usable. A 5/8" x 5-1/2" x 8" fence board runs around $7 bucks. Add $3 bucks for glue, screws, varnish, and shop consumables. So, for about one-quarter the cost and no more labor than reworking a Caviness blade, a fisherman's oar could be built. Note: If you want a pair of truly beautiful oars, rather than merely a good tool for a specific job, then triple your material costs and triple your labor. |
|
|
This post was updated on .
If you're planning to build your own oars, a good place to begin is to look at what others have done, such as the linked video, not much I agree with. But watch it and make up your own mind. https://www.youtube.com/watch?v=snsfkwWIYdE He says that narrow, broom-stick grips -- a style Bolger prefers-- are comfortable to his hands. I don't like 'em. Make up your own mind.
He prefers narrower than average blades, claiming they reduce 'flutter' --a condition I've never experienced-- and that they work better in rougher water. Well, they might. But I'd say that if the water is rough, then on shore is the place to be, not out in a boat, fighting the wind and waves. He says he made an effort to balance the oars. I'd say he didn't succeed. (More on that latter in the build.) So, let's address blade shape. CCL uses the same blade pattern for its 6'0" to 7'0" oars, where the following is a table of half breadths: 0.0, 0.00 0.56, 2.24 6.0, 2.16 12.0, 1.88 18.0, 1.47 24.0, 1.00 27.44, 0.69 ~50, 0.88 In plain English, the blade tip is curved to have a 5" radius. The max width of the blade is 4.69". The blade narrows rapidly and necks into the loom at 27-7/16" from the tip. (First image.) By comparison, a Caviness blade has roughly the same length and tip radius, but is wider by 3/4" and more "full bodied" throughout its length. 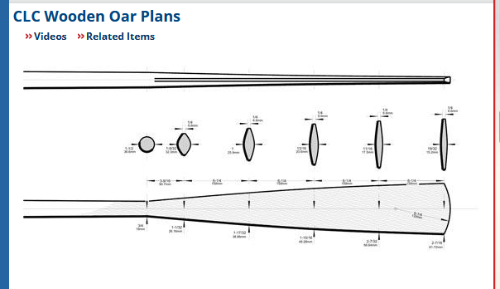 Me rowing with a pair of Caviness (that were thinned and pinned.)  My take is this. CLC's blade is too skinny. Caviness' is too fat. And both are too long. So, here's my compromise. (1) Use whatever tip radius looks good to your eye. (2) Make the max length 24" inches --measured from the blade tip to where the blade completely transitions into the loom) or 4" shorter than CLC or Caviness. (3) Make the max width 4-7/8" to 5-1/8" (depending on how powerful a blade you want and the stock you're cutting the blade from.) (4) Begin the taper from max width to loom at about 12" from the tip on roughly the following schedule, where a width blade of 5" is assumed and a loom diameter of 1/3/4": 0, 5 4, 5 8, 5 12, 5 16, 4-3/8 20, 3-1/4 24, 1-3/4 28, 1-3/4 (An image of this blade profile will be inserted later.) Meanwhile, here's yet another oar pattern, likely Culler's for an 8' oar. Notice that the blade length is about 29". When that is scaled down for a 6.5'. then the length becomes 23.5", or close to what I typically plan for, though my blades are nearly an inch wider. 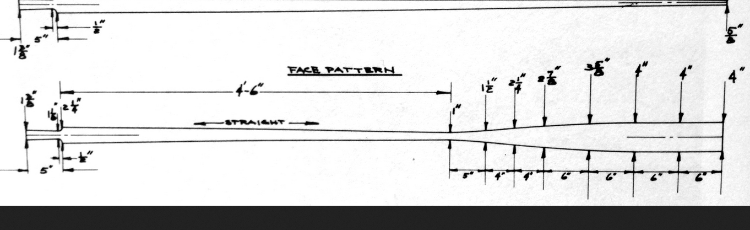 Note: The immersed area of the blade --and, of course, whether it's flat or dished-- determines how much water is grabbed on each stroke, and how efficiently it is grabbed, which can translate to 'power', but can also create turbulence. For recreational use, as opposed to racing, a less efficient blade --one that slips a bit-- can be a "kinder" blade to use if one isn't a conditioned, efficient rower. When building oars, go for close to the max bade width your stock will permit and then trim the blade when time on the water proves the blade is too big for you and your purpose for using oars. But if you really want just one number, then I'd say 4-7/8" x 24" is a good compromise for a 6.5' to 7.0' oar. |
|
|
I'm going to let the previous blade pattern stand. But I'm not going to use it. Instead, the following is what I've worked out where these are the half breadths, and the tip is given an 8" radius.
0, 2.38 (i.e., 2-3/8) 4, 2.38 8, 2.38 12, 2.25 (i.e., 2-1/4) 16, 1.88 (i.e., 1-7/8) 20, 1.38 24, 0.75 28, 0.75 Note: Exact measurements won't matter. The numbers are just suggestions that will result is an eye-pleasing shape and a useful, somewhat powerful blade. 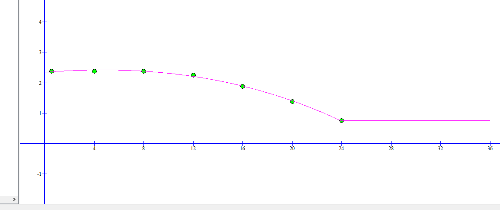 (Yeah, yeah. I need to insert a photo of the actual pattern, because the graph distorts the dimensions. |
«
Return to General discussion
|
1 view|%1 views
| Free forum by Nabble | Edit this page |