Building a Pair of Fisherman's Oars


|
This post was updated on .
If your purpose for building a small boat --say, something that's 8' to 12' in length and light enough to be cartopped instead of trailered-- is to create a casting platform so you --and maybe a buddy-- can fish small lakes --say, something the size of Timothy, Davis, or Crane Prarire-- AND you don't want to hang a motor off the back end, then you're going to be needing a pair of oars, and the grim truth is this. No one sells what you really need. That's partly because the three manufacturers who used to sell decent enough oars have closed, and it's partly because no one builds oars with the exact needs of small lake fishermen in mind.
For sure, plenty of outdoor shops will sell you something that looks like a pair of oars for about $100 bucks. But that's a lot of money to pay for junk that you're going to have to immediately reshape and rebuild. So, why not cut to the chase, head over to the lumber yard, spend less than $50 bucks and just 4 hours or so in your shop to build what you really need? Seriously, the oars you need for fishing small lakes are neither expensive, nor hard to build. So, let me show you how. But first, let me remind you of how oars get used when you're fishing. (to be con't) |
|
|
Typically, as in ‘nearly always’, oars are sized according to the beam of the boat without giving any consideration to the size, conditioning, or experience of their user, nor his/her intended purpose. But as a recent talk I gave on the topic of “Oars and Rowing” suggests, sizing oars needs to consider all three factors.
Furthermore, in most rowing situations, once the rower is in the boat, he/she doesn’t relinquish control of the oars. But it’s pretty hard to make a cast without letting go of the oars. If the oars aren’t indexed or pinned, then the would-be fisherman has to scramble to regain control of the oars after every cast. Thus, when the oars aren’t being used, they need to be out of the way. But they also need to be close to hand for when rowing is resumed. Thus, the oars paired with a boat meant to be a casting platform are going to be shorter than those used when the sole goal is forward, straight-line propulsion, and the oar blade –when oars aren’t shipped-- has to self-immerse no deeper than is optimal to resume rowing. https://www.youtube.com/watch?v=pwGNFyrAVqE&ab_channel=RiversWestSmallCraftCenter |
|
|
This post was updated on .
Plans aplenty can be found for shaping a pair of oars, and they fall into two categories: plans for carving an oar from solid stock, or plans for composting an oar. Either works. Both make decisions about the same things: blade shape, loom shape, grip shape and how to mount the oar and how to protect areas where the oar will chaff in the oarlock.
Let's begin at the problem of minimizing chaffing. The high-end solution is leathering. A low-end solution is cording. Either works. Chef's choice. Whether to button the oar is also a matter of choice. Going buttonless means gearing ratios can be changed on the fly. Installing a button means one less thing has to be kept track of and that the oar won't slip through the oarlock and go floating off. Sport shops sell rubber buttons that can be slipped onto the oar. But they tend to grab the oarlock and to disrupt the oar stroke. The better solution is a traditional leather button. If you don't have a suitable piece of lather, cut an old belt in half lengthwise, taper each end on a belt sander, wrap the belt half around the loom, secure it with brass tacks and/or glue, and then soak it with paint or varnish when you do the finish work on the oar. The button will last a season or two, as will the leathering or cording. And by that time, your preferences in oars will have changed, and you'll be building a new and better pair. The next problem to consider is how the oar will be mounted. It could be pinned, as is commonly done with Adirondack guide boats. It could be unindexed with respect to the oarlock, which is the default choice, which permits the stupidity known as "feathering". Or the loom could be shaped at the pivot point so that it is keyed to the oarlock and the blade is always oriented 90 degrees to the water (+/-5). That accomplishes three things. It eliminates having to monitor and control blade orientation. It all but eliminates the chaffing of palms created by using pinned oars. It allows for an easier bio-mechanical stroke (as I demonstrated in the YouTube video). |
|
|
This post was updated on .
Blade shapes are almost more a matter of aesthetics than physics *unless* the oars are going to be used for high-effort, straight-line propulsion, such as racing. Then, the shape of the blade matters, and much thoughtful, interest-engaging research has been done. But for casual, recreational use, the traditional "tulip" blade is plenty good, with this caveat. If the blade grabs more water on the 'catch' than your conditioning can sustain on the 'pull', then choose a slightly narrower blade that will allow more "slippage' and feel "lighter". As for the 'flat-blade vs spoon blade' debate, do your own research and make your own decision. If 95% to 99% of your rowing is directed toward 'propulsion', rather than 'positioning', consider a spoon blade. Else, and especially with a set of oars meant for fishing where a good portion of your rowing is done "backwards", stick with an easier-to-build flat blade.
Loom shapes are even more a matter of aesthetics than physics than blade shapes are. You'd like the lower loom to be as light as possible --consistent with sufficient strength -- to lower the weight outbd of the oar's pivot point, just as you'd like the upper loom to be as massive as possible --consistent with clearing knees on the pull stroke-- to increase inbd weight. Concerns about reducing 'windage' are nonsense *unless" you're racing. |
|
|
This post was updated on .
The previous posts have settled all important matters but three: 'grip shape', 'gearing ratios' and and 'oar balance'.
My YouTube video covers the latter two in detail. But here's a quick refresher. On the pull stroke, you don't care about the weight ratio between the inbd and outbd portion of the oar other than the oar shouldn't be so blade-heavy that effort has to be made to keep the blade at a good working depth. A hand-weight of 10 oz (+/- 2) generally achieves that, plus has this further benefit. On the recovery stroke, which is the only time an oar is functioning as a 1st class lever, a properly balanced oar feels light to the hand. What matters on the pull stroke is the gearing ratio one is comfortable with. Shaw & Tenney recommend 28%. I prefer 30%. Row a bit with oars having different ratios, see what you prefer, and build accordingly. Same-same with 'cross-handing'. If you hate it, you hate it. But you've just announced to the world you're clumsy, uncoordinated, and don't care about bio-mechanical efficiency. REMINDER: I'm talking about flat-water, recreational rowing here, not white-water drifting where safety and survival is what matters, not ease of effort. There, the possibility of smashed thumbs, broken hands and arms has to be mitigated by keeping the grips widely apart, where "How wide?" is a matter of experience and judgment. An aside. On the pull stoke, the oar is functioning as a 2nd class lever. But gearing ratios are always calculated as if the oar were only a 1st class lever. Worse, the ratio is calculated as if the two forces occur at the oar's extremes, which is clearly not the case. Thus, the whole business of calculating gearings is a fiction that could be corrected, but isn't worth the effort, because the ratios of effort aren't going to change, just how they are reported. Lastly, we come to 'grip shape'. Just as we all don't wear the same shoe size or glove size, a grip size and shape that is comfortable for one person won't be so for another. Bolger hates 'barrel' grips and condemns "their foolish swell". His preference is a 'broomstick' grip. Culler, an equally experienced open-water rower, prefers a 'flared' grip. I prefer a modified 'barrel' that is deeply scooped to accommodate the edge of my hand. Mark has gone with a 'hammer handle' grip. So, lots of choices. But if you're fly-fisherman --and especially, a rod builder--, then making a grip choice becomes easy, because you've dealt with this problem before. E.g., a 'Western' rod grip isn't a 'Full Wells' isn't a 'Cigar', etc. Some will feel "right" to you. Some won't. Oar grips are no different. Theoretically, the easiest, fastest way to shape an oar grip is to turn it on a lathe, as do the commercial mfgrs. Setting up such a lathe for home-shop use can get downright expensive or dangerous. The usual tool for shaping a grip is a draw knife or spoke shave whose use I've never mastered. So I rough the shape with a bandsaw, get the shape a bit closer with wood rasps and files, and then shoeshine it to the final shape with progressively finer grits. Below is the pattern I use, assuming an upper loom that is 2" square and cross sections at 1/2" Intervals. NOTE: If the grip is too narrow for your hand, increase the station intervals. If that pattern creates a grip that is too fat or too skinny for your hand, change the plotting points. The easiest way to create a new pattern is with a graphing program that will impose a 3rd order polynomial on your plotting points. Alternatively, the same can be achieved in a spreadsheet, or do a mock-up in clay and take the dimensions from that. 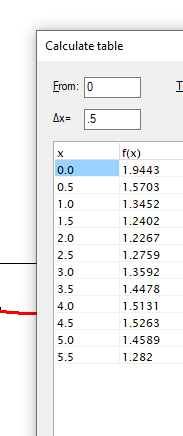 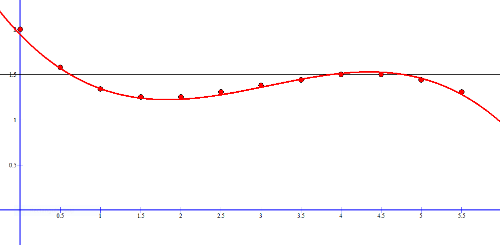 I love that profile. The edge of one's hand nests comfortably where it needs to be on the 'catch'. |
«
Return to General discussion
|
1 view|%1 views
| Free forum by Nabble | Edit this page |