A New Pram Begins


|
I was going to build a 12' pulling boat for Rivers West's, Race to Astoria (happening later this summer). I had the drawings done and the molds cut. But the project lost more momentum than I wanted to overcome. Instead, I found myself in the mood for something easy, fast, and familiar, which meant yet another fly-fishing pram whose design and construction problems I understand for having lost count of how many I've built.
This was my design constraint: as much boat as I could get out of one and a half sheets of ply without having to scarf planks. That meant something in the 7'6" to 7'10" range, 42" to 44" on the beam, by 14" to 16" deep at the mid-frame. It took most of a day pushing lines around in a marine CAD program until I had something whose curves looked right and whose nose was on the water and stern out. Another day was spent re-dismantling my setup for that 12' build and re-configuring it for this one. Today, I marked ply and cut my bottom and side planks. Yet to be done before hull assembly can begin is lofting the boat (so I can pick up bow and stern angles) as well as drawing how I want the bow and transom to look. With those things done, I'll build the bow and transom assemblies, cut a temp mid-frame, build the hull right-side up, dory-style, and then add in five pairs of radially-installed frames, the seat risers, a scuppered gunnel assembly, etc., all of which is just easy carpentry. Likely, I'll frame with cedar, because it's cheap, attractive, lightweight, easy to machine, glues and finishes well, and is strong enough for my use of the boat, which is a single-user, flat-water, fly-casting platform. I'm guessing a finished weight of 20 kilos, a theoretical hull speed of 3.5 knots, and costs maybe as low as $120, though $150 would be tolerable and wouldn't break the bank. I have no idea what construction time will be. But I want to be on water and doing a river trial in a couple of weeks. Charlie 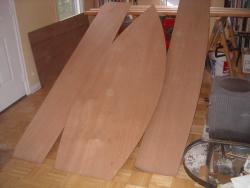 |
|
|
This post was updated on .
Day Five.
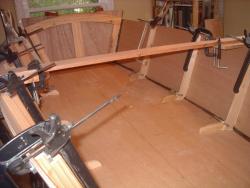
Bow and transom assemblies now cut, built, and glued. Tomorrow, I pull them towards each other to bend the bottom into a curved shape (its rocker), cut and position a temp mid-frame, and then start hanging planks. So far, progress has been like this. Nearly a full day to draw the boat to my liking in three views. A full day to create some construction drawings. Another half day to fix mistakes. (I'd starve to death as a draftsman.) A half day to cut the bottom and sides. A full day to rough out and glue up the bow and transom assemblies. A half day to trim them to final shape, to correct some asymmetries on forward end of the bottom, and to knock together gluing jigs. But now, it's time for a bike ride. With any luck, by Tuesday morning, the planking will be done and the boat completed except for the fitting out details, which is another week's work, but pretty hard to screw up. 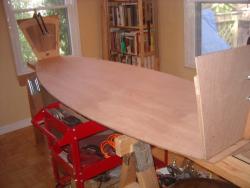
|
|
|
In reply to this post by Charlie43
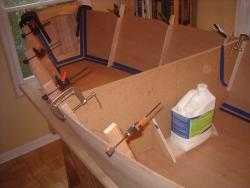
Another day's work got the planks positioned and masked for gluing and the upright leg of the frames roughed in.
|
|
|
In reply to this post by Charlie43
Another day's work got the fillets done (and curing nicely) and the lower legs of the frames cut. Tomorrow, I pull plank clamps, position and glue the frames, and begin fitting knees.
A boat is happening. 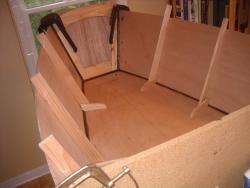
|
|
|
Decided not to wait until tomorrow to strip clamps, pull remaining tape, and remove the temp mid-frame, because the fillets were already rock hard, and parts weren't going to move any more. The dimensions ended up 40" x 92", instead of the drawn 43" x 92", the sort of difference that happens when gluing casually and letting materials take their own shape, rather constraining all parts narrowly. The beam diff might mean I use 6'0" oars rather than 6'6". Oh, well.
With the skin done and frames in the boats (though not yet glued), the hull weighs 28 pounds, with not too much more weight to be added: the gunnel assembly, oarlock blocks, seat risers, keel, and doubled skegs. (Thwarts are always removable --to make portaging easier-- and not added to boat weight, which is only what I have to lift as a unit.) My target was 20 kilos. I might come in as light as 17, or just under 5 pounds/foot. Another surprise is how little racking there is despite the boat being nothing more right now than an unreinforced shell. Another week's work should see this one in the water and me onto my next boat, Hannu's Portuguese Dinghy. |
|
|
In reply to this post by Charlie43
The frames are now glued. The keel, inwales, outwales, seat risers, and rubbing strips are now ripped.
|
|
|
Pulling clamps is like being a kid again on Xmas morning and unwrapping presents. Until clamps are pulled, you don't know what the boat will be like.
What I always look for at each building step is by how much 'racking' has been dampened by the addition of structure to the skin, which isn't a concern in traditional 'Plank-on-Frame' building. But I build 'dory-style', which could also be called 'Frame-on-Plank' or 'Frame-on-Skin'. By itself, an assembled skin is pretty floppy for lacking much structure. But as frames, knees, etc. are added, the hull stiffens and racking diminishes. Stiff. The boat is now stiff, with only minimal racking, and the gunnel assembly is yet to be built and the seat risers added. That's a result I find surprising, given that I'm framing with cedar, which isn't known for its strength or stiffness, and I'm using modest scantlings. But I can't argue with the achieved results. The table below is a jumble, because it's hard to format tables in this forum, nor does the table contain a head-to-head comparison of Western Red Cedar to White Oak, the default, traditional framing wood. But this is my take-away. Red Oak has 95% of the weight and stiffness of White Oak. Western Red Cedar has only half the weight of Red Oak, but two-thirds its stiffness. In framing with cedar, I'm giving away a bit of stiffness, but avoiding a lot of weight. Also, cedar is cheaper than White Oak, especially the fence boards I'm buying from places like Lowes or Home Depot, where the trick to getting decent material is to buy when a fresh pallet comes in, hand select for the best boards, let them air dry for a couple of months, run the boards through a planner, and then select for figure, color, and grain. ------------------------------------------------- NORTH AMERICAN SOFTWOODS Wood Species Specific Gravity* Compressive Strength (psi) Bending Strength (psi) Stiffness (Mpsi) Hardness (lb) Cedar, Western Red 0.32 4,560 7,500 1.11 350 cedar compared to walnut 59% 70% 56% 68% 37% cedar compared to red oak 53% 62% 50% 64% 27% red oak compared to white oak 95% 95% 95% 95% 91% walnut compared to white oak 86% 84% 85% 90% 66% walnut compared to red oak 90% 88% 89% 94% 72% poplar compared to red oak 70% 75% 67% 91% 41% |
|
|
In reply to this post by Charlie43
Setting the thwart height.
In his book on dinghies, Stan Grayson* suggests that a good distance for the thwart above the bottom is 8"-10", with the oarlocks 8-1/2"-12" aft its edge and 5"-7" above it. If the average American male is 5'9", then I'm slightly shorter than average, and my numbers should come from the lower end of those ranges. From past experimentation, I've found that a board of the same thickness as my thwart laid across a standard-sized paint can gives me a comfortable height in a boat in terms of being able to tuck one leg beneath me when I'm rowing (which is an admittedly weird position, but what I'm comfortable with when I'm just cruising along at a leisurely 20-24 stokes per minute, as opposed to pulling hard to get somewhere fast) and enough room to clear knees on the recovery stroke. For a 6'2", 180 pound friend, I had to set his boat up far differently, which is a fact about boats and their users everyone wants to ignore. Just as with bicycles and their riders, boats have to be adjusted to their users. One size or set of dimensions won't work for everyone, nor will they even work well enough for most, which is why people hate to row. The equipment is uncomfortable to use, because no effort was made to tune it to the user. 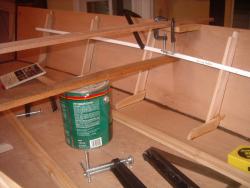 ------------------- *The second edition isn't just out of print. It's now unavailable from the used book sellers. But that's the one to buy if you can find it. |
|
|
In reply to this post by Charlie43
Pushed hard today.
Outwales, scupper blocks, and seat risers now glued. Left to do for the interior are inwales, oarlock blocks, and thwart. Maybe a day's work. Then I turn the hull over; fair the chine; glue the keel; cut, fit, and glue the doubled skegs. Roughly two weeks from when I began drawing the boat, it will be ready for oiling and varnishing. A week later, river trials. |
|
|
This post was updated on .
Adding a Rubbing Strip
Whether the boat is just a slab-sided, single-plank dinghy --and maybe especially if it is so-- adding a mid-strake rubbing strip adds to a boat's appearance (by creating a shadow line similar to that of lapstaked planks and echoes the sheer), and it even adds a bit more hull stiffness, so there's a tiny bit of structural justification for what --really-- is mostly a vanity item. Look at the two photos. Which look do you prefer? 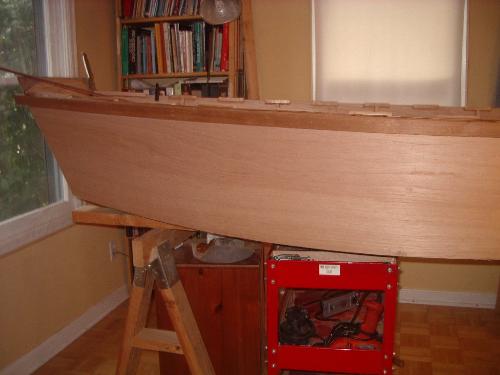 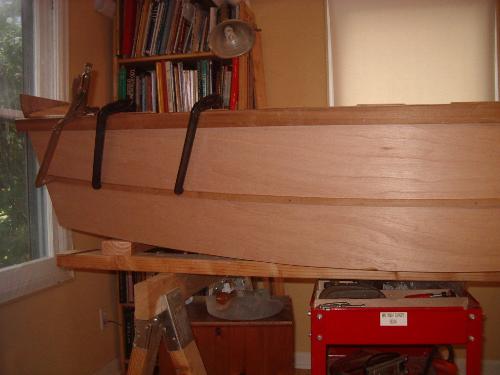 Gluing the strip would be a sloppy mess. I use 3/4" copper nails and fasten through the skin and into the frames. Whether the boat is varnished or painted, enough bleeds in behind the strip to further secure it. If a rubbing strip is planned, the time to do it is when you're ripping stock for the keel, outwales, inwales, and seat risers. Almost never can a board be cut so efficiently there is no waste. But if the layout is planned so that off-cuts too narrow for any other purpose become the rubbing strips, then the rubbing strips are "free". 3/8" x 1/2" is a good size for them, and --ideally-- their color needs to be coordinated with the outwale or the skin if you intend to finish bright. Whether that "co-ordination" means a matching or a contrasting color depends on the look you want to achieve. I've done both, and either works. 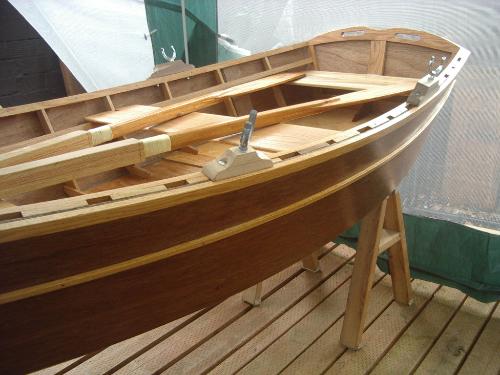 /> />
 |
|
|
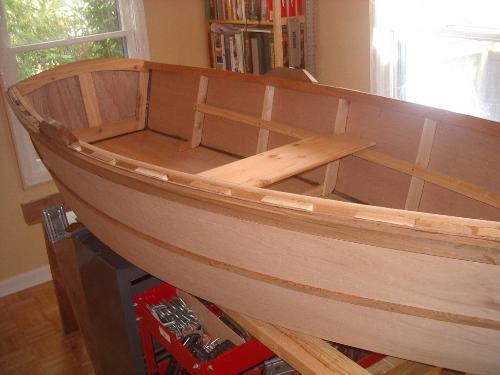
Fitting the inwales took six hours.
In mere minutes, you can wrap outwales around a hull, fasten them, and chop off their ends. But inwales have a compound angle at each end to deal with, plus the fact they have to be sprung into place if reasonably tight fits are to be achieved. Installing inwales is always hours of work for me. But all interior work is now done but for oarlock blocks (whose designing has me bogged down) and a removable thwart (that's roughed out and whose fitting should be straight forward). The keel and doubled skegs should be no biggie. Then I ease edges, clean up glue drips, and begin oiling/varnishing. Boat weight so far is 33 pounds, and the hull is very, very stiff --zero racking -- even though framed throughout with cedar and fairly modest scantlings. Finished weight should be around 5.3 pounds per foot. Finished costs, maybe $17/ft. But construction time (from loft to launch), a very prohibitive 20 hours/ft. I can build light-weight. I can build low-cost. But I can't build fast. That just doesn't happen for me, partly because I'm always building one-off, and partly because boats worth owing take a lot of time to put together. |
|
|
This post was updated on .
A couple minutes ago, I hit my milestone of all interior carpentry work done. I began drawing the boat Easter and have probably been averaging six hours work a day. So it took me about 90 hours to get this far. But nothing difficult remains to be done and nothing I haven't done a dozen times before.
 [Later] The last of the parts are now glued. Nothing left but the prep work for varnishing. Time for a bike ride. 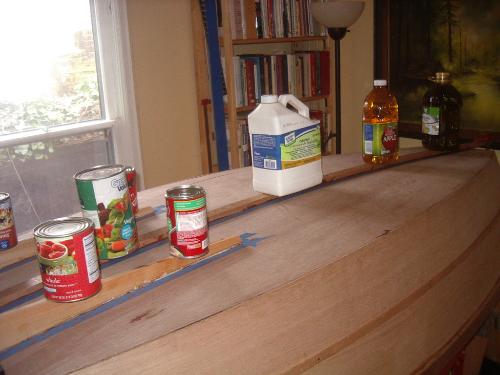 [May 1] Pulled the clamps and put the boat on scale. 40 pounds exactly, with just a coat of oil and 3-4 of varnish to go. |
|
|
This post was updated on .
In reply to this post by Charlie43
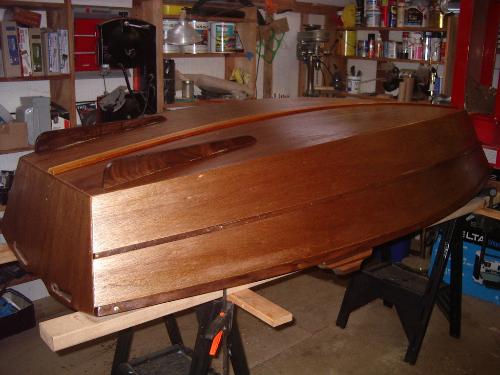
Interior now oiled.
 [Tuesday] Prepping the bottom for varnishing took about three hours. Applying the varnish, 22 minutes. It'll take two more coats to establish a good base, at which point I might quit, given that this is just a fishing boat, and the purpose of the varnish is to slow down moisture penetration and to make hosing mud off the bottom easier. |
|
|
In reply to this post by Charlie43
Varnish comes in many grades, with the the high-end stuff costing around $140/gal. I buy whatever is cheapest at Lowes in a satin finish. That used to be Cabots at $35/gal. But they stopped carrying it. Now, it's Helmsman at $40/gal. https://www.lowes.com/pd/Minwax-Satin-Oil-Based-128-fl-oz-Varnish/999914257
After dinner last night, I walked out to my shop to see how the second coat was drying. "I'm done", I said and came back in the house. Then, still not believing what I had seen, I walked right back out and took another look. I couldn't find a single reason to do another coat. None. Zero. Somehow --probably careful prep-- I had achieved exactly the look I wanted, a soft, matte glaze that covered evenly, but didn't attract attention to itself. Done in two coats. Unheard of. 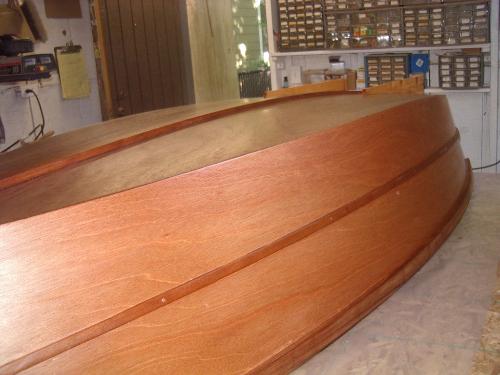 The key? Knocking down all high spots created in applying the first coat with a flat file, followed by a very quick scuff with 150#, followed by a dry wipe-down --no tack cloth, no mineral spirits--, then as fast a coating as possible with a 3" chip brush, followed by repeated tipping with that same, cheapie brush until it dragged. Can I repeat that effect on the next boat? Was this just a lucky, one-time event? I don't know. But I intend to find out. If the effect is repeatable, I'll be able to finish all future boats --oil on the inside, varnish on the outside-- in just three work sessions. Unheard of, but one more step toward lowering the costs of building a boat. Deks Olje #1 is $110/gal (with shipping and hazmat fees), which is 4x what I'd like to be paying for boat oil. But I've been using Deks for 40 years, and I'm unwilling to try anything else, because it does the job I need a boat oil to do. I used about 20 oz. Round that cost to $20 to be sure. That took care of the interior. I probably used a quart of varnish. Call that $10. Add $10 for bushes, sandpaper, a bit of Bloxygen, mineral spirits, latex gloves, and paper towels. Estimated boat costs look like this: $60, 1-1/2 sheets of ply. $10, 24 lf of cedar fence board. $20, epoxy, Titebond, and screws. $40, finishing costs. $20, consumables and misc. $150 for an 8' pram, or the same as most of my boats. Estimated building-time (from loft to launch, which will happen tomorrow at Smith and Bybee) will be around 100 hours, or one-third faster than usual. I'm done. I'm happy. Now I move on to my next boat, a stem dinghy for which little remains, just fitting keel, skegs, thwart, and oil/varnish. Then I break for a two-week fishing trip. On my return, I get back to a 12' pulling boat, which I started a couple months back, but lost interest in, and also begin Hannu's Portuguese Dinghy, which I want to be done with in time to display at the FBB. That's a boat that invites being painted. But I know I'm a crappy painter. So it, too, might get an oil/varnish finish. But that's a problem to be dealt with when I get to that point in the build. |
|
|
This post was updated on .
In reply to this post by Charlie43
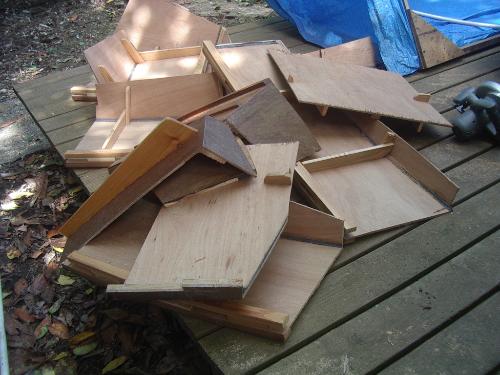 Yep, that's my new pram, now a pile of firewood. A recreational, oar-stroke rate is 20 per minute. It takes just 30 seconds of pulling to tell if a boat's lines are right, and maybe a minute more to confirm that adjustable things-- like thwart height, oarlock height and distance-- are close enough. I did two river trials with my new pram. But 30 seconds into the first one, I knew I was trying to convince myself that the boat's trim wasn't as bad as my experience said it really was. A second trial merely confirmed what I already knew. I'd drawn a bad boat. That's that fourth boat I've cut up (rather than give away), and I'm sure there'll be more failures in my future. But this morning's trial with a 9' footer (built last summer for a neighbor and never used by him or tested by me) confirmed I can --occasionally-- draw good lines. (How 'lines' get fitted out is a whole 'nother matter that has little effect on performance on the water, the only thing that really matters unless one is just building wooden toys for display, as opposed to boats meant to be really used.) Now comes the task of going back to the drafting desk to discover-- if I can-- where I screwed up with one design, but got another exactly right. But later, later. Now that I'm committed to using that boat for two week's of fishing very soon, I need to go back through it and tweak everything I can so it fits me, and not my 6'2" neighbor. What made that new pram's performance so bad? Or --differently-- what was I looking for that the design failed to achieve? I was looking for 'stable enough to stand and fly cast', 'glides across the water and carries well', 'tracks arrow-straight', 'rows effortlessly', and 'isn't tiddly or busy'. The new pram failed every one of those goals. Gorgeous looking boat. At 40 pounds, a feather to pick up. But totally useless as a boat to fly-fish from. So now it's firewood. |
«
Return to General discussion
|
1 view|%1 views
| Free forum by Nabble | Edit this page |