A New Build Begins

12
12

|
This post was updated on .
With a design completed, construction can begin, which should always begin by lofting the boat, which means using one's Table of Offsets to draw enough of the boat that full-sized that patterns can be created and angles pulled.
A "real" boat-shop would have proper lofting-room, which isn't a luxury available to the typical "backyard builder", nor a necessity. If one is planking with ply, rather than timbers, the as-yet uncut sheet goods make a good lofting-table if laid across the waist-high saw horses and 2x4's that are the foundation for the building frame. For any boat, at least how the garboard strake intersects with the stem and transom in profile should be drawn, and --for a pram-- the sectional expansions for the bow and transom. Convenient to have, also, is the mid-frame bulkhead, which becomes the mold, which can be cobbled together from scraps more easily if one has its pattern rather than just numbers. 36" wide, shipping or wrapping paper, in brown or white, is cheap and is easy to make legible marks on. A 4' drywall square is useful for the Y-coordinates. A good eraser is helpful, because plenty of mis-markings will happen. A consistent set of rules by which one's hash marks are always made is a good thing to decide upon as well, so that mistakes can be more easily unraveled later. My preference is to use the edge of the drywall square to draw the vertical ticks and the functional equivalent of a draftsman's triangle butted against its edge for the horizontals, so that all intersecting lines are crisp and more exact than can (typically) be done freehand. Such precision isn't really needed when marking paper. But good work habits make the layout on ply go faster and easier and reduce the effort to check fairness with battens. I'm not sure how much of the building process I will document, given that this forum is mostly Rivers West's neglected step-child and that so few members "draw what they build, or build what they draw". So the photo record will be as it pleases me to provide. But if someone does have a question their own research efforts can't answer, feel free to post it. Charlie 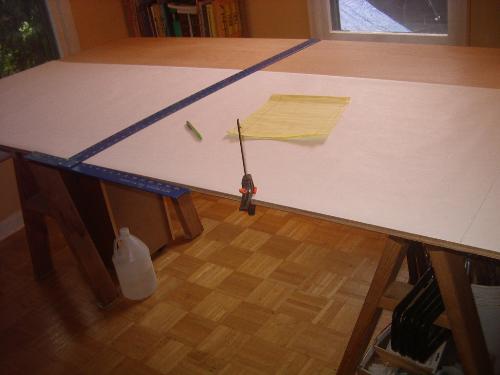
|
|
|
After a detour of several days to help a new member get started on drawing himself a shallow-draft, stable, burdensome, sailable tender, I'm back to marking and cutting wood.
One of these days, I'll build a professional set of lofting ducks. Until then, raiding the pantry for weights works just fine. The batten is a 1/8” x 1/2” x 8' aluminum strip from Lowes, which I've found easier to work with than wooden battens, for offering a good balance between stiffness and flexibility and a crisper edge to mark against. Being marked out on 1/4", 1088 Merenti is the sheer strake, to which I'm adding 3/4” to the lower edge, because the hull will be built 'filleted-lapstrake', rather than true, edge-joined S&G, even though that's how I drew the boat. Explanation: When drawing a multi-chine boat, if you draw also draw the plank laps, and not just the upper edge of the intermediate planks, all you've done is double the number of lines to keep track of and to correct. So I never do it and just add the laps when I'm laying out. Also, long ago, I stopped trying to spile planks on the building-frame and now do all of that work at the drafting-table. Way faster; way easier; far less mistake-prone; far more satisfying. “Draw what you build; build what you draw.”  |
|
|
In reply to this post by Charlie43
Day 2: Built the mid-station mold; cut the garboard strakes, the bottom, and faired their edges.
Tomorrow, I'll design, cut, and build the bow and transom assemblies. Another day to position parts and to tape the chine glue lines. A day each for filleting the two strakes. But by Sun morn, I should be pulling clamps off the outwales and be beginning to fit seven pairs of double-knuckled, sawn frames. 
|
|
|
This post was updated on .
In reply to this post by Charlie43
A cartoon (from Italian: 'cartone' and Dutch: 'karton'—words describing strong, heavy paper or pasteboard) is a full-size drawing made on sturdy paper as a study or modello for a painting, stained glass or tapestry. Cartoons were typically used in the production of frescoes, to accurately link the component parts of the composition when painted on damp plaster over a series of days (giornate).
Day 3: Cartoons are now done for the bow and transom assemblies. From the 'Table of Offsets', a 'Lofting' can be created. A 'real' boat-builder would draw the traditional three views. I only do the profile, because that's enough for me to pick up the angles for how the bow and transom intersect with the bottom. For how the sides intersect with the bow and transom, I pull those angles from the bottom itself once it's cut. To make my cartoons for the bow and transom assemblies, I'll use expansions from the Table of Offsets (aka, the cutting patterns). Why the need to create cartoons? Because a basic, marine CAD program can't be forced to draw framing details. The higher-end ones would do the job, but at the "cost" of more time learning how to make CAD drawings, as opposed to "free-handing" it "life-sized" until the proportions are right to the eye. It took me 4 hours to work out the framing details and proportions for the transom, maybe 20 minutes for the bow, because I merely copied the same "look", though still to be decided is whether I cut a sculling notch in the transom. I'm inclined not to, because I never have a need to maneuver a boat in close quarters with a single oar, and cutting a motor notch is simply out of the question. (I HATE motorboats.) The ends of the crowns will be rounded once the skin is complete and I'm tying the inwales into the transoms. But for now, they are drawn over-sized. The dotted lines are the actual boat. The solid, outer lines provide stock for beveling, because I interpret my Table of Offsets to be to the inside of planking for sides, but to the outside of planking for bows and transoms. Hence, the finished assemblies need to end up larger than the computer-generated cutting patterns would predict them *unless* a lot of CAD work were done. But I find it easier to let the computer provide me with line drawing that I adjust as needed. Now I give myself one last chance to decide on which wood to frame with, which probably comes down to either walnut or cedar, because I don't think I have enough redwood on hand to complete a whole boat. But I really should make a run to CrossCuts to verify I can't find something comparable to walnut's weight/strength/color for the sake of exploring a wood new to me. [Later.] In fact, I did do a run to CrossCuts. Khaya --which I had never framed with-- was a couple bucks cheaper per SF than Walnut, my all-time favorite to frame with for both its mechanical properties and its appearance when oiled. So I picked up 40 LF, or probably enough for two boats. In terms of properties, Khaya seems to score well against Walnut: 95% of its Weight, 94% of its Compressive strength, 90% of its Bending strength, 92% of its Stiffness, and 106% of its Hardness. If I had my druthers, I'd trade away a bit of its hardness to gain Compressive Strength. But the whole package looked pretty good. However, reading further at the links below suggests that Khaya also offers problems, chiefly, interlocked grain and only moderate durability, which I'll have to be aware of and work around. http://www.wood-database.com/african-mahogany/ http://www.hardwoodtogo.net/african-mahogany-species-overview/ http://www.woodfinder.com/woods/khaya.php 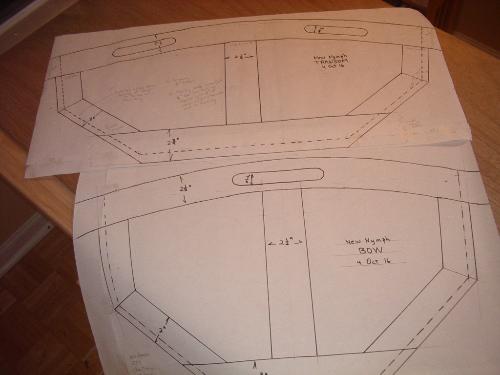
|
|
|
In reply to this post by Charlie43
Day 4: Layout Work
"Figured" Khaya is generally “fuzzy” Khaya, where the interlocked grain has resisted being planed to a smooth surface. At CrossCuts, I was selecting for boards offering long runs of straight grain, minimal fuzziness, and not trying to capture figure. But figure is what's needed in prominent pieces like bow and transom crowns. So I made a cutout and tried to find the most attractive fits among my five boards. Then, on a lark, I nested the two silhouettes and discovered that they could be cut from the same board if it were 7-1/2” wide, which was the width of the piece I had set aside to cut the thwart from. So, I had a choice: cut one thwart from the wide board and set aside the other half for another thwart later on, or cut the crowns and thwart now and try to find another thwart board later on. Immediate material efficiency won the vote. Note: The as-drawn handholds are overly large and will be reduced in depth and width. 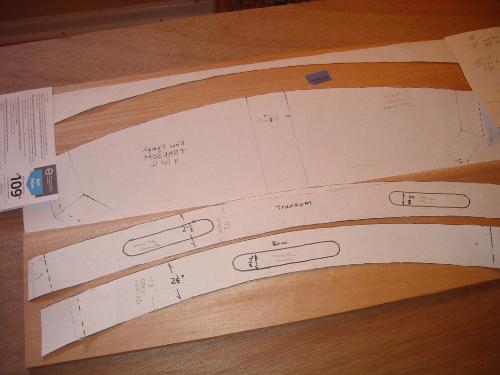
|
|
|
In reply to this post by Charlie43
I'll be interested to find out how you like working with Khaya. I love the color and figure of this species, but have found that often it has a tendency toward movement after rip cuts. Often the cut length may move inches across 8 feet or so. It also often stabilizes back to its original shape after a couple of weeks.
|
|
|
Mark,
What thicknesses of Khaya were you cutting? That might make a difference in how much a long rip-cut relaxes the interlocked grains, hence, allows movement. Also, ambient moisture in your shop. If your shop is drier/wetter than the store where you purchased the lumber, that difference might contribute to movement. In fact, if after a couple weeks you saw the cut board move back to its cut shape, I'd bet moisture (or temperature) was the culprit, more so than the wood itself. I'm working with 1/2" thicknesses and --typically -- short pieces, nothing longer than 16". For my inwale and outwale, I'll be ripping 1/2" x 1" x 8' lengths. But there, movement can't happen once the piece is glued, and even if the strip relaxes immediately after ripping, the distortion won't matter, because I'll fit the curve to the boat, and then have to plane it down anyway to be flush with the scuppering blocks. What I can report is the Khaya cuts easily, glues superbly, but tastes terrible, the same bitterness that walnut has. As for color, that's something I'm tolerating, rather than welcoming, because I'm planking with Merenti, whose best pairing is with walnut. Their browns complement each other the way that Khaya (or cedar) looks good with Occume. But I do appreciate Khaya's lower cost and lighter weight than walnut, and I'll build with it again. Charlie |
|
|
My cuts were in 4/4 and 5/4, S2S. I think the kiln drying was the culprit. Maybe a little aggressive on the kiln, which means the exterior is dry, interior is still moist. But who knows? Eventually it will stabilize. I like that about khaya.
As for color, the slightly orange color is a nice compliment for some paint colors. I like it with 'Mojo's dark blue. SO - if you are not into paint. Maybe you do something else. It is what it is. And your mileage may vary... "this is may way, what is your way?" - Rumi Mark |
|
|
This post was updated on .
Mark,
Color --its emotional and intellectual impact, never mind individual preferences and dislikes-- is a hugely complicated subject that the boat-building world has never attempted to deal with, AFAIK, and certainly not to the extent the art world has. But color matters, and color isn't “relativistic” in the sense that all choices can be defended or have equal merit, and a more skilled colorist cum experimental psychologist than me can lay out the reasons why we humans can make the cross-cultural, often quite universal, ranking judgments we do about what is 'ugly', or 'beautiful', or something in between. I can accept Kyaha's 'orangeness' and work with it. But I know it's not part of my "preferred palette". Also, it needs to be pointed out that figured Khaya, which I wasn't selecting for, but the straighter-grained boards which tend to be blander, could be used very effectively for things like chests of drawers, but not for boats meant to be finished bright. I can't find the photo just now. But some wanna-be boat shop planked and framed a skiff in aromatic cedar that is truly ugly. Their "wood-working" skills were furniture-grade. But the boat is a failure, because they let 'color' get away from them, rather than being able to control it to a balanced, proportioned end. To choose to build in wood, whether "traditionally" or in more "modern" modes, is both to engage and to challenge what has been done before and makes one subject to the praise or scorn of one's peers who have the earned right to say of completed work, "That's beautiful. That's ugly", and a lot of that judgment depends on how color was selected for and then managed. The aesthetic judgments that can be made about constructed objects, such as boats, are not idiosyncratic expressions of arbitrary taste (i.e., ...my way vs. your way), but informed evaluations of a designer's or builder's skills. Some people draw bad boats. Some people build bad boats. Some people have no eye for color. In terms of color alone, 'beautiful' doesn't float any better than 'ugly'. But why wouldn't one choose one rather than the other other? Charlie |
|
|
In reply to this post by MarkR
Day 9 (and behind schedule), but finally achieved a good-enough dry-fit.
The next step is to prep the hull for filleting, which means verifying that all seams are tight to the exterior and the hull isn't "racked". Then the hard part of the build is done. A finished boat cannot fail to happen, and what remains is just the no-brainer details of doing the fillets, cutting and fitting gunnels, frames, risers, thwart, oarlock blocks, keel, and skegs. With some planing/sanding/oiling and a pair of oars, the boat is ready for its river trial. In fact, I'm feeling so "been there, done that" about this build, my third this year and 14th so far, that I'm going to abandon this thread in favor of other projects, like my re-build of a rowboat into a sailboat, or my re-draw of Whisp as a 10' footer (from its original 16'). But if anyone has questions, feel free to post them. Charlie 
|
|
|
Day Umpteen: Finally ready for filleting the garboard strake.
I neglected working on the boat for a week, for wanting to deal with financial markets instead. Also, the side to transom fits were giving me fits when I tried to close them up. When something like that happens and I'm confronted with a problem for which a solution isn't falling into place, I back away for a couple of days, so I can come at the problem with fresh eyes. But those fits now are now good enough, and the side to bottom fits are nearly perfect with no daylight at all to be seen their full length. The tape marks out the boundaries of my 3/4" fillet lines. 
|
|
|
Day Umpteen, Plus Three or Four
Just finished filleting the sheer strake. The hard part of the build in now behind me. (Actually, the hard part of the build was the garboard to the bottom. The sheer planks fell into place easily, and transom/stem to bottom is never hard.) What remains is just some carpentry work: gunnels, thwart, seat risers, oarlock blocks, frames, keel, and skegs. Lot of pieces, but nothing difficult. Maybe another 40 hours. Then I oil and varnish and put in for a river trial. Yeah, that's packing tape you're seeing on the plank to pull the plank inward to close the occasional 1/32" gap. But it's not wires or electrical ties, which is where I depart from conventional S&G. They butt adjoining planks. I overlap them. They need to fillet two seams and then, also, to tape them. I fill one seam and tape nothing. When done right, I can 'dry hang' planks as fast as them, but my gluing time and expense is one-quarter theirs and my weight is probably one-third. In a few very special cases --"tortured ply" construction-- conventional S&G is the only thing that makes sense. But for fake POF construction, which is what S&G amounts to, conventional S&G is ill-thought nonsense. 
|
|
|
This post was updated on .
Day Who Knows What: Fitting Frames
Ugh. It took a full day's work to fit two frames. A lot of that was 'thinking time', deciding how I wanted to solve the problem and then modeling alternatives with stiff paper. Some of it was laying out my stations on the hull. (I decided to go with five, rather than my usual seven.) Some of it was ripping stock. But the actual time to cut and fit was probably 60 to 90 minutes per frame, which is still a lot of time, given I've got eight more to make. But two are ready to glue, and I like their look. The two end pieces overlap the mid-piece on its same side. In more traditional work, each frame piece would overlap the next, creating a 'stair-step' effect. I haven't yet completely rejected doing things that way, and it might yet happen. I need to get more frames built before I can really decide. 
|
|
|
This post was updated on .
Frames, scupper blocks, and outwales are now glued.
Hull-wight (so far) is 36 pounds. Estimated, completed weight is 45 pounds, or just a tad over my targeted 20 kilos, which is mostly silliness for being a nice round number, rather than any meaningful target. Translated to pounds/foot, framing with Khaya is working out to about 5.8 pounds/ft. Using walnut would have put the boat weight (7'9" x 3' 8") around 50 pounds, oak around 55, but cedar (possibly) under 40. So using Khaya is a "mid-weight", "mid-cost" solution that I'll definitely build with again. (Figure $8/sf for walnut, $6 for Khaya, $4 for oak, and $2 for cedar.) It machines and glue well and is rated as sufficiently durable for a boat that's hauled out after use. Khaya's one downside (for me) is its blond, bland appearance. But I did score a reddish brown plank at Crosscuts (12" by 8') that would make gorgeous frames on another boat. 
|
|
|
In reply to this post by Charlie43
Trimming planks.
 Cleaning up gunnels. 
|
|
|
This post was updated on .
Applying a second coat of oil to the interior made more sense than an fourth (or fifth) coat of varnish to the exterior, which was already looking better than expected. In 20 minutes, I was done and hammering the lid back on the can. Now I wait for it to dry and shoot for Tuesday as being the nearest, dry day for a river trial.
The build began Sept 27, and ended today, Nov 25, a very long, two months of not continuous work. My best guess is my usual 150 hours and $150 for materials. A good-looking boat. A river trial will prove whether is a good boat or not. It should be. I borrowed the bottom from Bolger's Nymph, flattened the rocker, chopped 5 inches off the sheer at the bow, flared the sides (he draws them plumb), installed five, short-legged frames instead of his three transverse ones, used a transverse thwart instead of his longitudinal one, crowned the bow and transom and cut handholds, scuppered the gunnel, and installed doubled skegs. So, other than those few minor details, it's his boat, which I had built once before as exactly as he drew it and exactly Payson finished it out. But I knew from using the boat those changes were needed if it were to be what it the boat it coulda/shoulda been if B&P had really thought about what they were doing, instead of catering to the "instant boat" crowd, which is a crap way to draw and build. Aside: 'Fast' isn't bad. 'Thoughtless' is. Bolger got the bottom right, as he always does, but little else about the boat is worth repeating, and Payson is the worst builder I know of in terms of consistently doing work in ways one cringes to see done. Nice guy and fun to read; but a bad builder. I framed with Khaya, and the final, finished weight was my targeted 20 kilos. That makes my fourth boat this year and Hull No. 14 lifetime to date. (Still barely a journeyman, right?) But I started lofting my next boat today and can now end this thread to begin a new one. 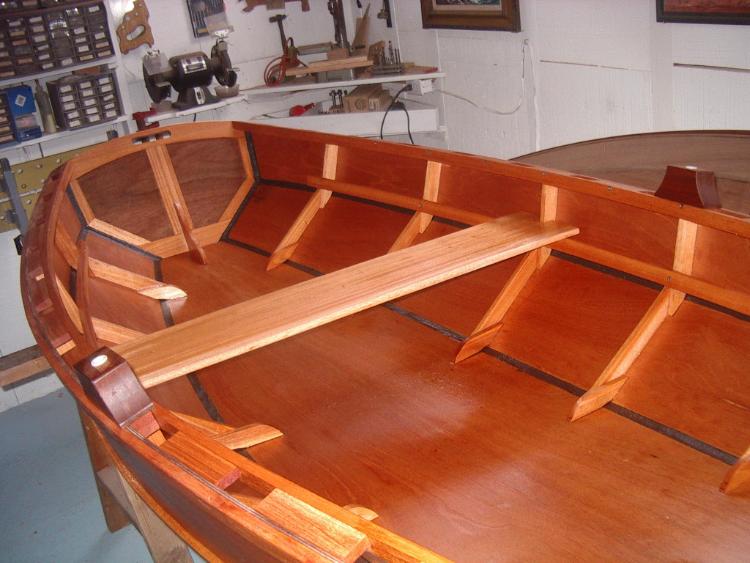 |
|
|
Very nice looking boat! But don't end this string yet: How about a photo of the completed boat in the water?
|
|
|
Mark,
Weather permitting, I'm going to put in for a river trial at RW's dock Tuesday afternoon on what looks to be the only dry day for the coming week. I'm hoping John O will be in the shop to take the photo. Otherwise, I'll bring the boat to the next Open House that it isn't raining, and John B can do the photography. Charlie |
|
|
Yesterday's River Trial Revealed Three Problems
One problem is how to wheel a boat with a 44-inch beam through the gate to the dock. Another is fixing a port side, mid-frame leak. A third getting the bow and stern higher above the water. Gate problem: When single-handing a boat, unload it off the cart, carry it (or slide it on carpet) through the gate vertically, and then reload it. I could carry a 45-50 pound boat all the way down the ramp, but not a 70 pounder, which is what a 12' boat will weigh. Solution: Build a boat cart that's easier to load/unload. Leak problem: My best guess is I was filleting with too stiff an epoxy mix. A brute force solution to fixing the leak is taping the seam. But if I've gotta 'glass seams, I'll build boats that really do require them, rather than ever use 'glass to fix a problem that shouldn't have happened in the first place. So, if more varnish doesn't fix the problem, I burn the boat. (I used only 3 coats varnish, rather than my normal 5 to 7.) Waterline problem: There is no solution to the problem of the nose digging in and the stern dragging other than to put a rower in the boat who weighs 40-50 pounds less than me. I went back to my drawings and confirmed that the rocker I used should have created the displacement I wanted, which was the nose kissing the water and the stern clear. But that's not what happened on the water. So the boat's unusable to me, and the proper solution is to burn it, but not before I take off its lines and build a longer version with an increased ability to displace water. Two possibilities suggest themselves for the discrepancy between the projected and the achieved waterlines. One, the boat I built on the frame wasn't the boat I drew at the drafting table, which, in fact, is always the case, because materials take on a life of their own. But I've done 14 hulls so far and never had this problem before of being so far off on where the boat would sit on the water. Two, maybe the CAD program didn't like computing displacements for a narrow-bottomed, double-chiner and got the math wrong, and the problem hadn't showed up before, because I generally draw fairly beamy, single-chine, flat bottoms. But forewarned is forearmed, and I'll be more generous with the rocker in future boats. My intention had been to make my next hull a three-quarters version of Steve Redmond's, Whisp. The plans were drawn, and the ply was in the shop ready to mark and cut. But the results of this river trial bug me enough to want to get to the root of the problem. So I started comparing the two boats. Whisp's waterline beam is 26.5". I put a hull in the water with a waterline beam of 22.5", or 4" narrower, which is why it moved so easily under oars. If I keep that beam and extend the overall hull length to 144", I can keep a pram shape (which I prefer to the skiff shape that Whisp is), but maybe end up with a faster, more sea-kindly, easier to build boat. So, that's the plan. Build a new boat, and then burn the one that failed. |
|
|
Too bad! It is a beautiful little boat sitting in the shop. But it sounds like you are well on your way with learning from this build.
When I worked in design, we had formalized a procedure of evaluating process. It was referred to as "Lessons Learned." Upon project completion, we would review the project based upon the client's evaluation of process and result and our internal evaluation of process and result. Basically what went right and what went wrong. Out of that came improvements to our process and an expansion of our base of knowledge. The goal was that everyone who participated in the process became a better practitioner and the next project would be more successful. Every once in a while we would have what we considered a failed project. Because in our firm "good enough' wasn't good enough. Those were always the projects that taught us the most. Lots of information to work with. Sorry this one didn't work out, but standing on the shoulders (gunnels?) of this boat, the next one will be a better boat! Cheers! |
«
Return to General discussion
|
1 view|%1 views
| Free forum by Nabble | Edit this page |